SuperMoto Junkie banner
281 - 300 of 662 Posts
Discussion starter · #281 · (Edited)
When I punched the holes through my grips, I forgot to mention there's something that happens that would be best to address. So if you consider that say a throttle tube is 110mm long (don't quote me, just picking some figures for my particular situation), a throttle grip is actually a fair amount longer due to how thick the rubber at the end is from the inside to the outside. This would leave a small void at the end of the throttle tube around the handlebar, in my case 6mm long. Basically you would have a section of the grip that could be squeezed all the way in to the handlebar. Normally if you cut the grip with a razor you would be shortening the overall length, but whereas my grip is original length still, I wanted to fine tune the set-up. Not sure if that makes sense, but pictures will explain better.

Cut 6mm long section from my old throttle tube. Did 2 so I'd have a spare. Well actually, I made them slightly different. I turned one down a little bit to reduce the diameter, because I thought my aftermarket Motion Pro throttle tube was not as thick as the OEM. It ended up being the full diameter as the OEM. I did both functions on a lathe, but you could cut your piece with ordinary means and come up with a good result.


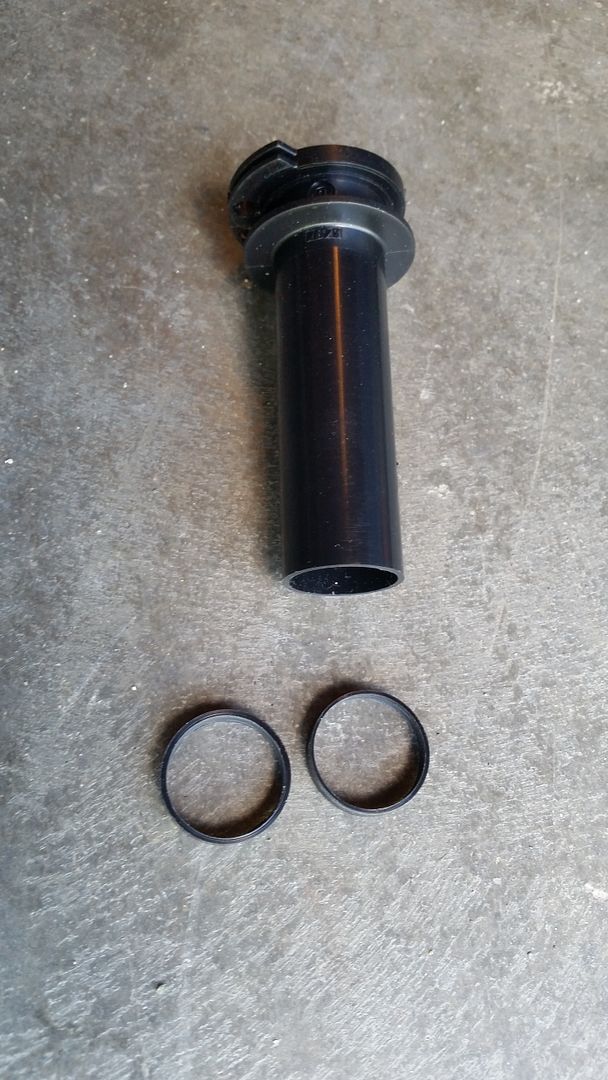
Inserted into the end. This is basically extending the throttle tube, because now it can go the full length of the grip and not stop at the bottom of the grip where they leave extra rubber.
*My throttle tube still needs to be adjusted inward. In the pic, it's hanging off the end of the handlebar more than it should be. Also, not sure if I mentioned, but I've decided to use plastic threaded inserts in the bars for the handguards instead of the wedge style that comes with them. I had them kicking around from one of my sportbikes that I had dirtbars on years ago.

 
Discussion starter · #282 · (Edited)
I had a boo-boo when installing the left side grip. Doesn't that just beat all? Sometimes it's the trivial things that don't go right. The things you've done countless times before...
So here's what happened. I loosened up the screws in the left side switch housing so I could slide it down the handlebar out of the way enough to make sure I got the grip on fully until the end was flush with the end of the handlebar. When I put the grip on, there was some twisting and wrestling of the grip to get it into position. My hand pushed the switch housing further up the bar. Apparently there was a little screw that protrudes and left this.


Arghhh I was so angry at that. Especially cuz I know that every time I put my hands on the grips, that scratch is going to be staring me in the face. I think I have come up with a solution though. That's what building a supermoto is all about. Problem solving, right?
The solution is actually a two sided benefit. I found a company that makes carbon tubes. I will order the correct diameter to slide over the bar and cover up the scratch.
The second benefit is a safety issue for me. If you are already using a Brembo clutch master cylinder like what comes on the EXC, you might have noticed that the adjuster knob for the initial lever position is dangerously close to hitting the switch housing. This is amplified if you have smaller hands and have adjusted the lever in towards the handlebar at all. The switch housing and the lever perch have to be spaced properly or you run the risk of the adjuster knob hitting the switch housing and preventing you from pulling in the clutch all the way. For me, the safety issue comes from the fact that the relative position between the two can change. Mostly due to the rotating KTM perch clamp that I'm using. It's designed to move. So if you had a crash, or the perch bolts weren't tight enough to maintain position, the two could work their way closer and create the same issue.
 
Discussion starter · #283 ·
I may make an entirely new rod, but for now, this will suffice. This is a bushing I made to extend the front axle sliders. The Xtrig clamp, if I read correctly, space the forks 10mm further apart. This is the reason, they sell a kit with a 5mm rotor spacer, a new wheel spacer, and a longer axle. Well, the KTM Hard Parts front axle slider kit is designed to work with OEM components. So I made a bushing to create a longer rod to slide through my axle. It's 10.0mm long, 12.0mm diameter with a 6.0mm through hole. I will use a longer bolt. If this setup and dimensions work fine, I may make a new rod, so it's a solid piece.

 
Discussion starter · #285 ·
Working on getting a nice front brake setup. Beringer caliper and master cylinder. Until I can upgrade, I will be using the Braking rotor, which I'm sure is a little disservice, but the price was right. And it already has a magnet for the speed pickup. :D
I asked to order a new brake switch for the Beringer M/C, and I was sent (not sure if I should mention him by name) one free of charge. Not only did he send it FOC, but he shipped it Priority Mail and I had it in 2 days. I'm dumbfounded. What sellers offer this kind of service these days? I really feel like this was above and beyond considering it costs at least $6 to ship anything Priority in one of the flate rate boxes.

New brake switch for Beringer.

 
Discussion starter · #286 ·
I just run a narrower switch pod.
I have thought about this too. I was thinking about getting the European 500 EXC switch housing or perhaps one of the ones from Sicass Racing. What kind of housing are you using?
 
Discussion starter · #288 ·
A touch of thin epoxy resin on that scratch would wet it out and the scratch should be hard to see after that.
That sounds better than the nail polish I initially thought of. Thanks on the tips guys!
 
I asked to order a new brake switch for the Beringer M/C, and I was sent (not sure if I should mention him by name) one free of charge. Not only did he send it FOC, but he shipped it Priority Mail and I had it in 2 days. I'm dumbfounded. What sellers offer this kind of service these days? I really feel like this was above and beyond considering it costs at least $6 to ship anything Priority in one of the flate rate boxes.
Kinda off topic. I run Ballistic batteries in my bikes. Also have their balance charger. I somehow lost the A/C adapter, emailed them to sell me a replacement. They instead sent me one free, also priority mail. Sofa king badass!
 
Discussion starter · #292 ·
Discussion starter · #293 ·
Kinda off topic. I run Ballistic batteries in my bikes. Also have their balance charger. I somehow lost the A/C adapter, emailed them to sell me a replacement. They instead sent me one free, also priority mail. Sofa king badass!
Awesome!
 
Discussion starter · #294 ·
Rrrr1rob. I use this unit fron sicass racing.

http://sicassracing.com/store/switc.../universal_switches/sicass_universal_multi-function_bar_switch?cPath=105_35_39&

I also run a Berringer cast iron rotor and 4 piston caliper. It works ok but need a bro12 master. The stock brembo lever is just to soft IMO but I had to try it first☺.
Good to know! Does your switch housing have the indicator light on the top for the high beam? Mine is built into the instrument cluster, so I guess that's a function I could live without.
 
No, functionally fine.

Sitting in the gas station the other day, almost got ran over because of it. I still rock a horn. Can't hold the clutch in and honk the horn at the same time.
 
Discussion starter · #297 · (Edited)
Didn't accomplish too much today. But made some labels for some of the wiring behind the headlight and at the tail.


A lot of them are self explanatory in that you can't mess them up because they don't duplicate many of the plugs. I started down this path mostly to label the right and left turn signals, so I took it a step further, but I didn't label everything.


and then like everybody with a KTM, I tidied up some of the wiring under the gas tank to simplify gas tank installation.


Not great pics, but oh well.

 
Discussion starter · #299 ·
No mylar labels?
Only had access to normal Staples (office supply chain) type printing material and a Brother label maker. The adhesive is not super weather resistant, but the lamination is pretty good.
 
Discussion starter · #300 ·
Got this little decal made up. My wannabe factory edition. Haha.


It wasn't quite what I was asking for, but I put it on for now anyway. Working on getting a new one with some alterations. Some of the decal was supposed to be chrome reflective.

 
281 - 300 of 662 Posts